Steps to creating safe Windows RDP (Remote Desktop Protocol) connections:
The following uses examples from a Workgroup based, Win 10 Pro computer. Domain joined pc's will look slightly different in some cases. Windows Terminal Server has a robust security model for keeping RDP connections to it safe. This guide is intended for RDP to a single computer, although, the last step could be used for Terminal Server.Setting up Windows RDP
Setting up Windows Firewall
Using a Custom port (optional)
Allowing RDP though the main firewall
Using VPN for connections
Limiting access by IP address
SekurAliro Software
Setting up Windows RDP
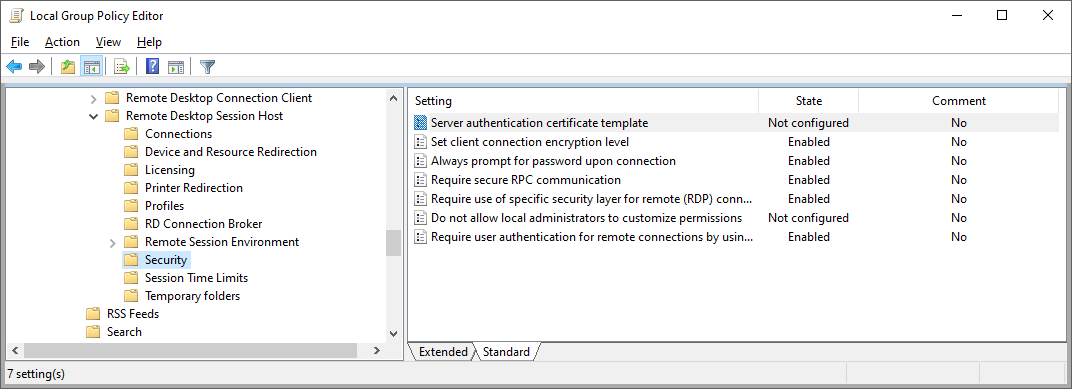
First, make sure the system is properly configured to be as safe an RDP connection as possible.Open GPEDIT.MSC (the Local Group Policy Editor) from the command prompt and go to
"Local Computer Policy/Administrative Templates/Windows Components/Remote Desktop Services/Remote Desktop Session Host/":
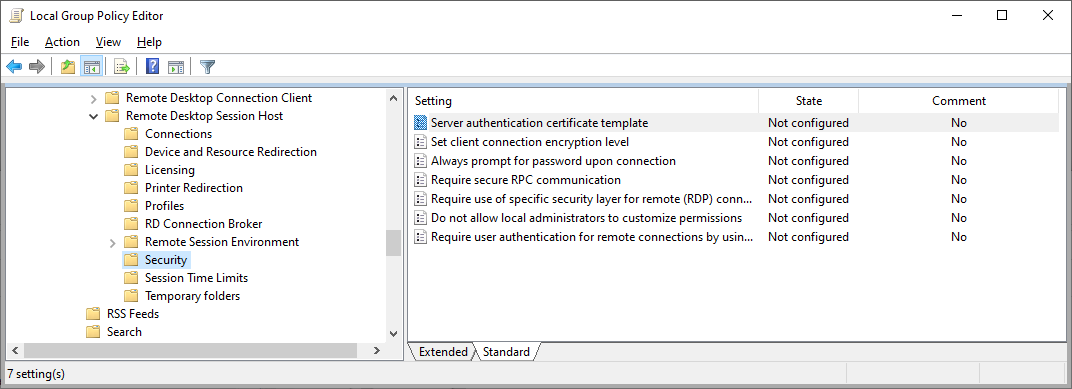
Enable the items below and use the defaults. For "Require use of specific security layer..." select SSL
Allow RDP connections by going to the Remote Desktop setup under Settings:
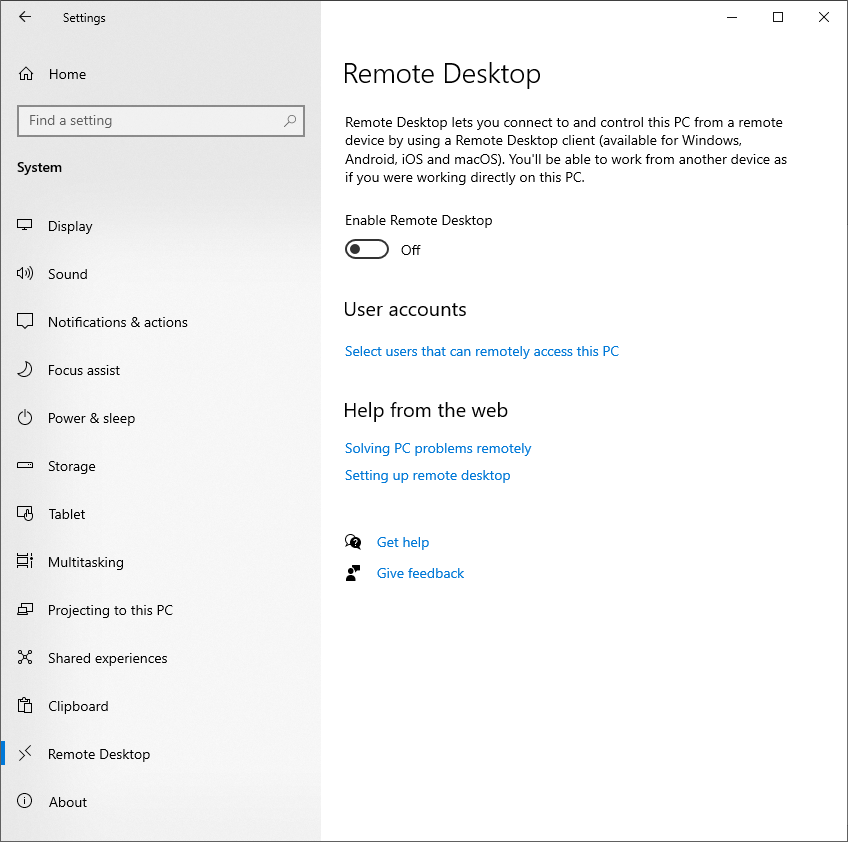
This will open up the default RDP port, 3389 and allow access for everyone on the local network.
You may also find this under the Control Panel, System Properties on older systems:
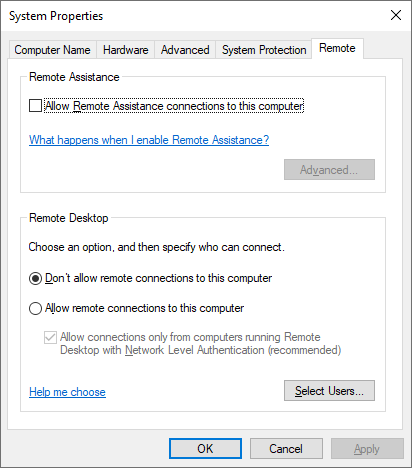
Also, select the Users that are allowed to access this computer (the administrator account will already have it)
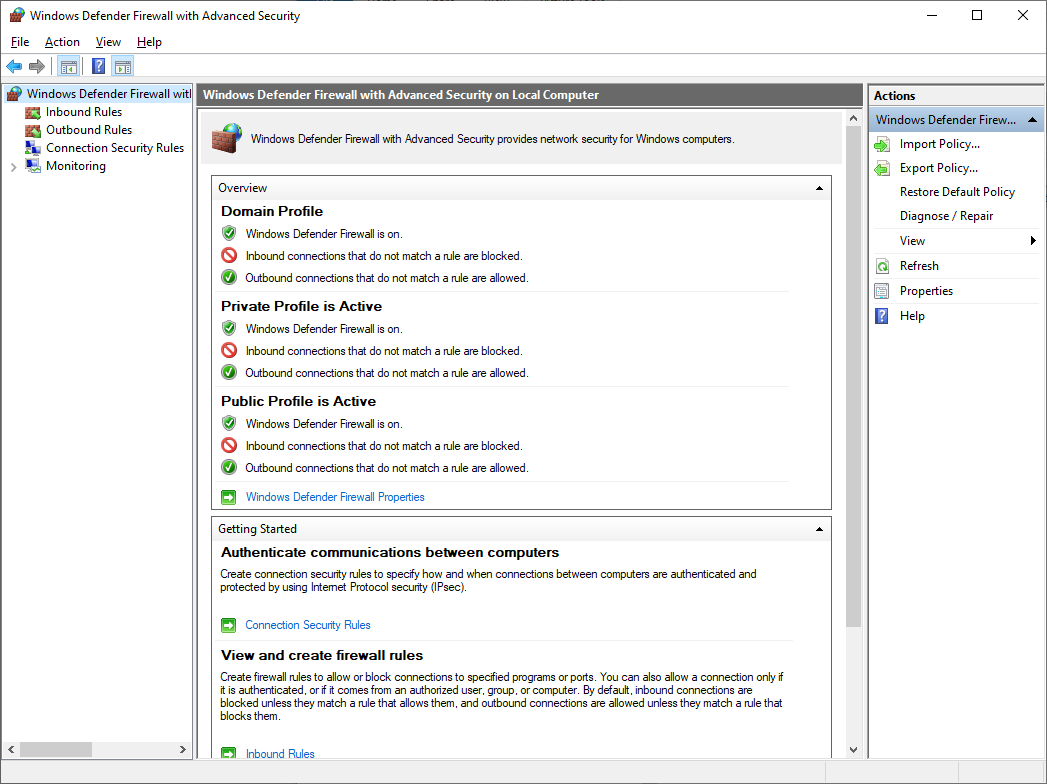
Setting up Windows Firewall
The local Windows Firewall should be on: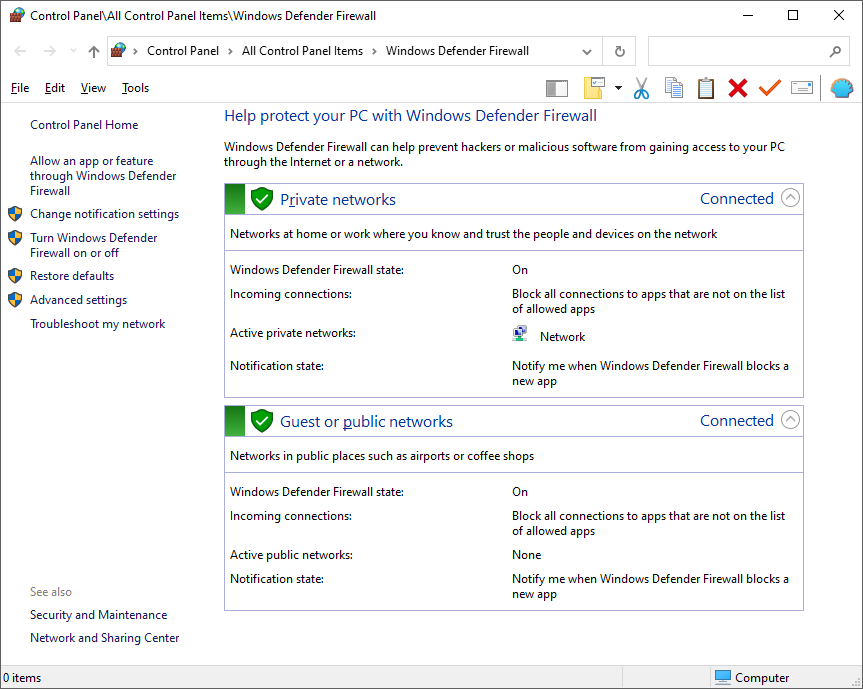
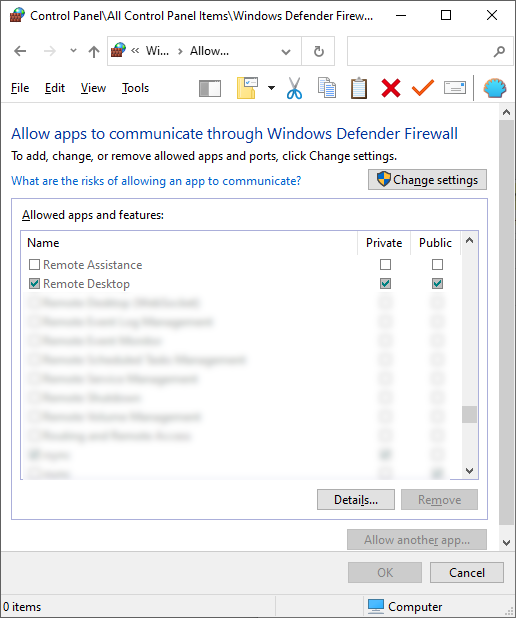
If you click on "Allow an App or Feature..." and then scroll down to "Remote Desktop, you will see it has been allowed:
Now test to see if you can use RDP from another computer on the same network to see if you can get access.
(optional) Using a Custom port
The default RDP listening port is 3389, but you may want to change it to a different one, as hackers will always check to see if that port is open. Ports can be from 1 to 65,535 but most below 1024 are reserved for other uses. If you choose too high a port, it can be blocked by some firewalls (like at hotels or free Wi-Fi spots). More info on port numbers can be found here: WikipediaTo change it, you have to first change a value in the Registry and then create a Firewall Rule for it.
As an Administrator, from the command prompt, run REGEDIT
Go to this Key: Computer\HKEY_LOCAL_MACHINE\SYSTEM\CurrentControlSet\Control\Terminal Server\WinStations\RDP-Tcp
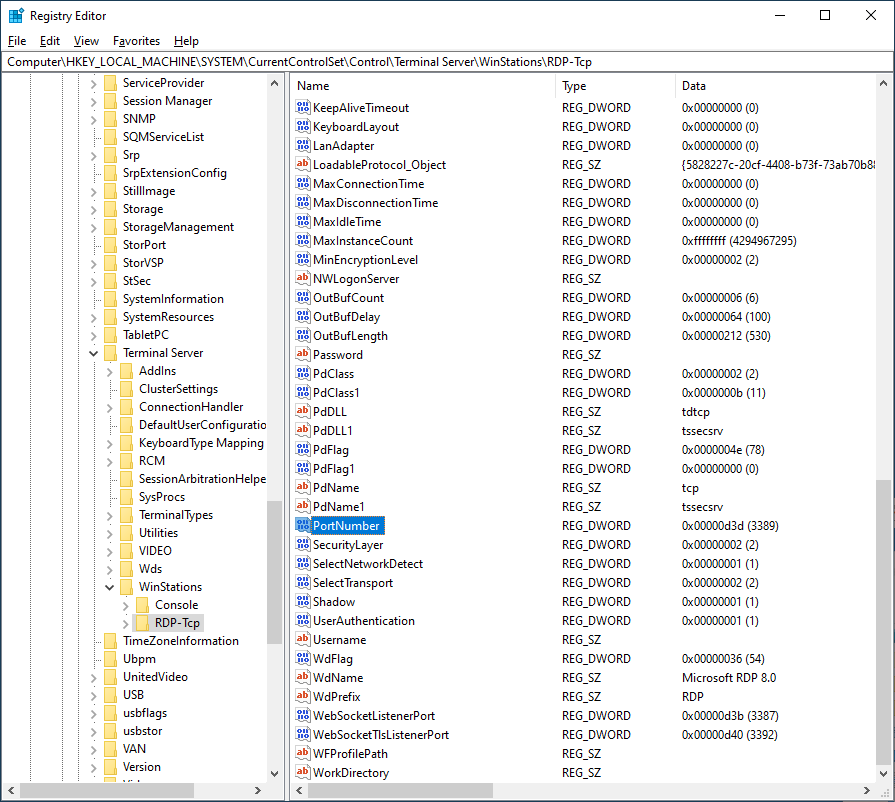
Edit the value (in Decimal) to the port you want to use:
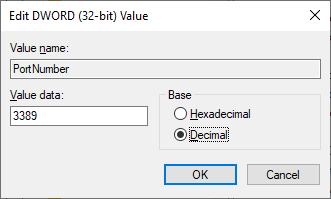
This won't take affect until after a computer restart.
Next, you have to create a rule in the Firewall to allow for it. Open Windows Defender Firewall with Advanced Security (the Advanced settings from the Firewall screenshot above):
Select Inbound Rules on the left side and select New Rule on the right side:


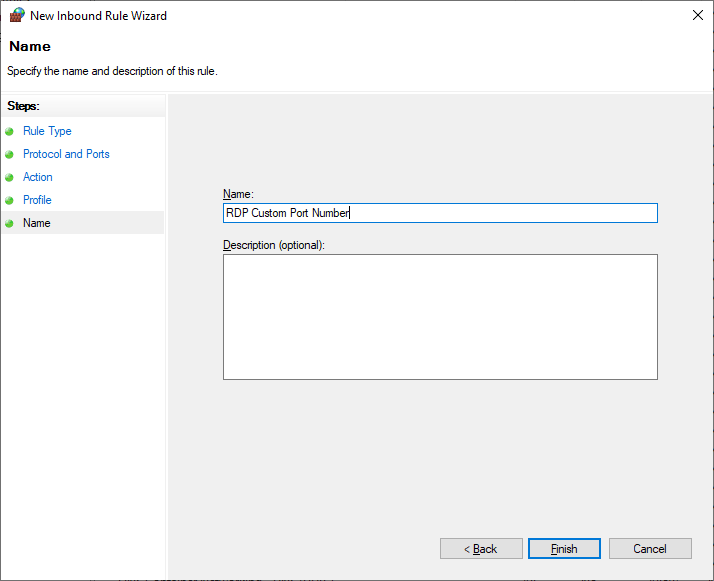
After finishing this, reboot and try connecting from another computer on the same network. You will have specify the custom port when connecting:
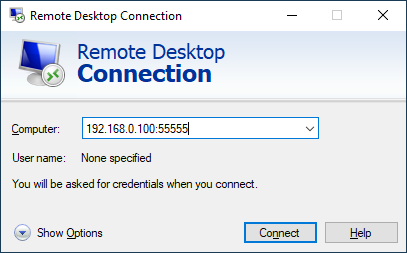
You add the custom port number after the IP address and a colon.
Allowing RDP though the main firewall
Once you know RDPing works on the internal network, you will have to configure the main firewall to allow that traffic in from the outside. Every firewall will have it's own way to do this, but doing an internet search for the model number and "Allow RDP", "Port Forwarding", or "Open Custom Port" should direct you as to how to do it.WARNING: This does open the port and computer for attackers at this point! I suggest you do one of the hardening steps below.
Test that the connection works before further hardening of the RDP access. (Your firewall should allow to create the rule and then turn it off after checking that it works)
Using VPN for connections
Business grade firewalls (and some pro-consumer ones) allow for VPN (Virtual Private Networks) to be set up. These vary by make/model and will either work with Windows built in VPN setup, or require a client (which may cost extra) to make the secure connection. Doing an internet search for "VPN" and your model should let you find the setup. The idea is that you don't actually open a port on the firewall, so then it can't be attacked. Once the VPN connection is established, the remote computer is treated like it is on the Local network.The drawback is that it removes the isolation of that remote computer from your network. Only allow computers that you manage to connect this way. If you allow an unmanaged computer to connect via VPN, any virus infection it gets will spread to your local network!
Limiting access by IP address
This limits access to the computer with an open RDP port to just those Public IP addresses you specify. Every other computer will get a Can't Connect error message: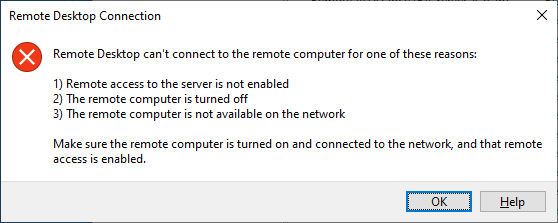
This is an excellent way to protect your RDP-able computer and internal network. This is accomplished by setting the Scope of Remote Allowed IP Addresses in the Windows Firewall. Go to either the default Firewall Rule (for port 3389) or the Custom Rule you created. For the default rule, edit the rule called "Remote Desktop - User Mode (TCP-In)":

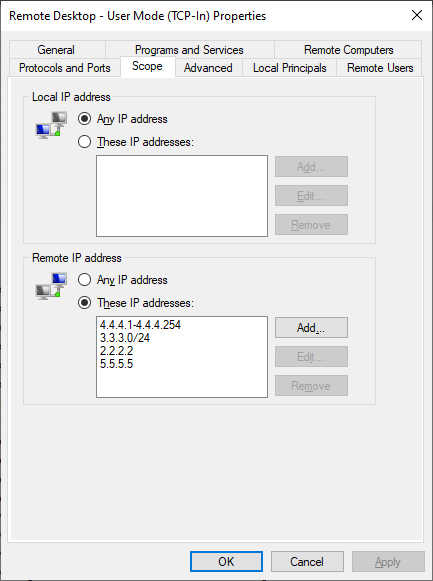
You can add a range (of the local network) or single IP address (of the user's Public IPv4 address).
You will want to keep track of whose IP's belong to each user in a file as this will usually change every once and while, due to their internet provider resetting it or if their router is rebooted. Not many people have static IP addresses. They are usually Dynamically assigned.
SekurAliro Software
I was keeping track of them in a Notepad file, but have created a program that can modify the firewall and keep track of this info. It is available for free, without any warranty, here: (requiring .NET 5)setup.exe
or
setup.msi
Using SekurAliro ("Secure Access" in Esperanto):
Note: Before using the software, make sure there is at least 1 entry in the Firewall Rule, otherwise it won't be able to find one to add comments to. The software needs to be under an Administrator account since it modifies a Key in the restricted area or the Registry.
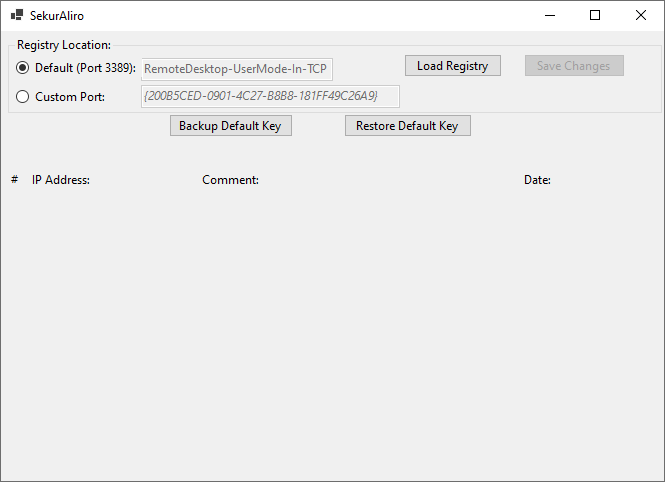
If you are using the Default port (3389), then just load the registry. If you are using a Custom port, you will have to manually find the key name in the registry. Make sure there is at least 1 entry in that custom rule and then search for that IP address in the registry under this Key (it will look like the example above):
Computer\HKEY_LOCAL_MACHINE\SYSTEM\ControlSet001\Services\SharedAccess\Parameters\FirewallPolicy\FirewallRules
Once you load the Key, you can add a Comment and modify the Date:
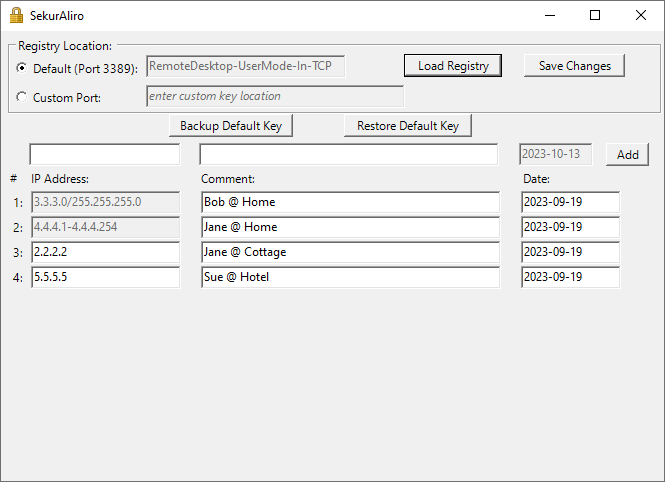
You can Add an IP Address (not a range though - it is shown but not editable. You can only do that through the Firewall) and a Comment & Date
To Delete an entry, just empty the IP Address field.
To Save your changes, click the Save Button.
Note: There is only basic error checking on the IP address you've entered, so make sure they are valid.
The first time you run the program, it makes a backup of the Default Registry Key, which you can Restore back to, erasing all your changes.
Comments: comments@sekuraliro.com
Bug Report: bugreport@sekuraliro.com
Feature Request: featurerequest@sekuraliro.com